
Because agents often have niche markets they focus on, our accounts allow you to customize the property search experience on your website so only those listings that fall under your specialty appear in the search results. And you can make adjustments so they are found more easily within the search features on your site.
Not only can you make these adjustments to the property search experience, the changes are really easy to make in your control panel. Let’s take a look at what you can do.
Custom City List
By default, the list that appears when clicking “View All” on the IDX Search page includes all the cities available from your MLS system(s). You can customize this list to better represent your market area.
To create a Custom City List:
- Login to your Control Panel and navigate to Setup > Search Settings
- Click Search Cities under Search Setup
- Turn the Custom City List ON
- Use the check boxes to select the cities for the custom list
- Click “Save Custom City List”
- The list of custom cities will be displayed on the right side of the page. To make additional updates, select or clear the check boxes as needed and save the changes
Below the area where cities are selected, you’ll see the option to restrict searches to the custom city list. Checking this box will prevent autosuggestion of cities that are not in the custom city list. It will also remove the “More” option seen when a client clicks “View All”.
Property Types & Prices
When visitors first view the search form page, default property types, and default minimum and maximum prices, are already entered into the corresponding fields on the page. You can customize this default information so that it best matches the needs of your target audience. (Visitors can also change the minimum and maximum amounts when conducting a search.)
The following options can be found in your IDX Control Panel > Search Setup > Property Types & Prices:
- Select which property types you want to include on the IDX tools
- Customize the name that is used for that property type
- Customize the default minimum and maximum prices associated with that property type
- Change the order in which the property types are displayed in the drop-down box
- The Property Type drop-down box is on the Search, Email Updates sign-up, and Featured Listings pages
To configure default property types and prices:
- Login to your Control Panel and navigate to Setup > Search Settings
- Click on the Property Types & Prices tab of the Search Setup page
- Select which property types to include in your search
- Modify display order, name, and price range as desired
- Click Save Changes
Search Location Customization
The Location field in your Property Search forms will intelligently autofill as users type a location. You can make the autofill recognize more locations such as schools, neighborhood or subdivisions (where available in your MLS) to help users with their searches.
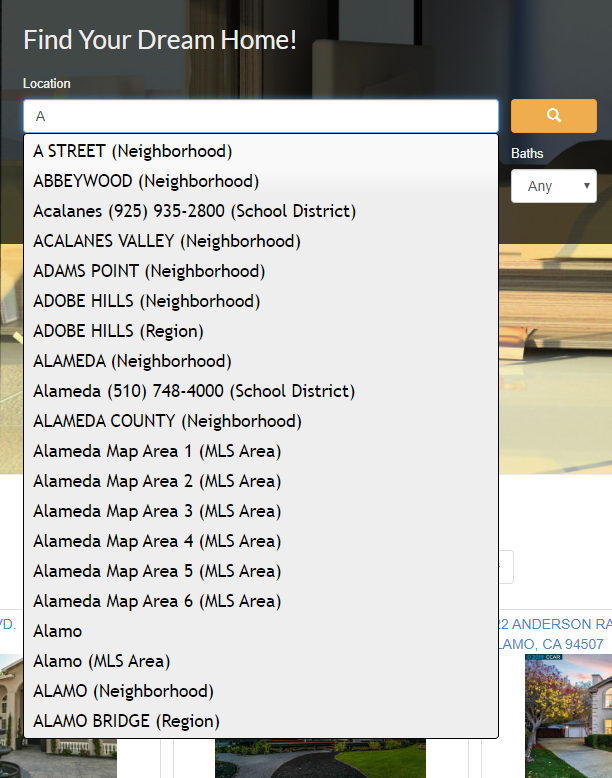
Customizing The Location Field
Here’s how to customize the Location field:
1) If you’re using Optima Express, our IDX plugin for WordPress, make sure you have updated the plugin to the latest version.
2) In your IDX Control Panel, go to Setup > Search Settings > Location Customization
3) Select the areas you’d like added to your Location field’s autosuggest from the available geographic fields. These vary from board to board, and the quality of the data can vary as well. You can preview the entries in each field.
4) When data from a selected field appears in autosuggest, the field type will be included in parentheses for clarity. For example, a school district entry would appear as “Springfield (School District)” to differentiate this entry from the city of Springfield. If you wish to change the display name for a field you’ve selected, please enter it in the Display Name field. Make this field empty if you’d prefer to not display the field type.
5) Save changes.
6) Add the new location types to the default text that appears in the Location field, so your site visitors will know what criteria they can type in their searches.
Premium Search Default Search Presets
In Premium plans, the property search page provided with your account will load with the default center point and zoom settings entered in your account. Learn how >
You can also embed multiple map search instances throughout your site on your own pages, each with different default location settings. Learn how >
Recent Articles
[av_postslider link=’category,723,722′ wc_prod_visible=” prod_order_by=” prod_order=” date_filter=” date_filter_start=” date_filter_end=” date_filter_format=’yy/mm/dd’ items=’9′ offset=’0′ contents=’excerpt’ columns=’5′ preview_mode=’auto’ image_size=’portfolio’ autoplay=’no’ interval=’5′ alb_description=” id=” custom_class=” av_uid=’av-kijhad9e’]